• Home
  • About Me
  • Tutorials
    • Bags
    • Children
    • Women
    • Home
  • Free Sewing Patterns
    • Bags
    • Children
    • Women
    • Quilts
    • Home
  • Shop
    • Sale
    • Essentials
    • Flash Sale
    • Kits
    • Sewing Gifts
    • Pre-cut Fabric
    • Sewing Patterns
  • Roundup
  • Contact

The Stitching Scientist

    DIY 10 Minute Fabric Letters Name Decor

    Decor· Free Pattern

    12 Mar

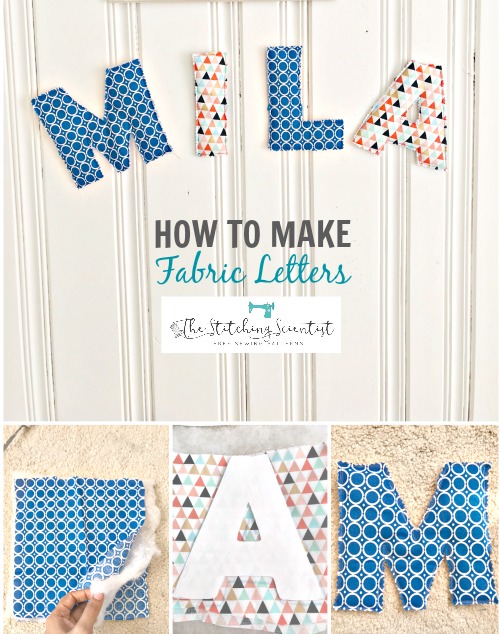
    Hello Everyone. Hope you are all doing well. I have been looking for ways to include my daughter into my sewing and thought doing some quick fabric letters of her name for her room was a good start. These letters literally took us about 10 minutes to make. I think even a longer name would have taken the same amount of time. It actually took us longer because my daughter was helping me. Here is our tutorial of a quick DIY 10 Minute Fabric Letters Name Decor. I think we may end up doing some of these for the different holidays and hang over our fireplace mantle.

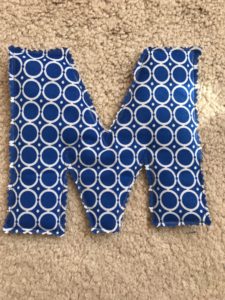
    My daughter chose these fabrics from my scrap bin. The “a” and “i” are Hobby Lobby Piper Triangles Fabric. The “m” and “l” are from Joanns. You can really have fun mixing and matching fabrics for this project. I am not a fan of the fabrics my daughter chose but it’s her name so I had no say in her choice.
    Your Supplies

    • (8″x8″ squares x number of letters in name)x 2. For my daughter’s 4 letter name, we cut out 8 squares of fabric.
    • 8″x8″ squares of thick batting x number of letters in name
    • Pinking sheers

    Step 1

    Print and cut out your letters. I used Arial Black Font with 500 font size. If you go to text effects, you can do outline of the letter instead of printing all black and wasting ink. Or, you can just use a light color instead of black.

    Step 2
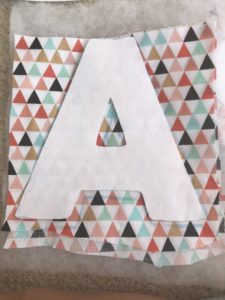
    Letter fabric

    Trace letters on right side of fabric pieces. I used colored chalk.

    Step 3
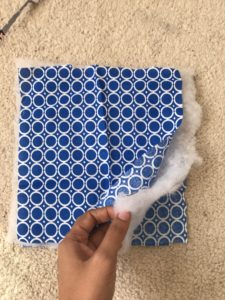
    letter fabric

    Make a sandwich of top fabric with traced letter, then batting, then back fabric with wrong side facing up.

    Step 4
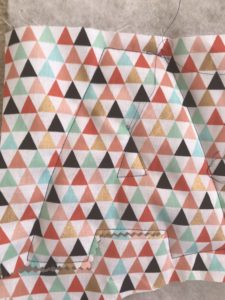
    letter fabric

    Pin all 3 pieces together or hold in place and sew on your traced letter mark.

    Step 5
    letter fabric

    Cut out your letters using pinking sheers. Remember to cut on the outside of your sewing line.

    That’s it! Glue letters on a string and hang on a wall or tape on a wall.

    Thanks for visiting and Happy Sewing.


    « Free Friday Pattern Roundup
    Single Mom Challenges »
    Close
    Forgot password?
    Send me my password!

    Close message

    Login
    • This blog post
    • All blog posts

    Subscribe to this blog post's comments through...

    • Add to netvibes
    • Add to My Yahoo!
    • Add to Google
    • Add to Microsoft Live

    RSS Icon RSS Feed

    Subscribe via email

    Subscribe

    Subscribe to this blog's comments through...

    • Add to netvibes
    • Add to My Yahoo!
    • Add to Google
    • Add to Microsoft Live

    RSS Icon RSS Feed

    Subscribe via email

    Subscribe
    Follow the discussion

    Comments (7)

    Loading... Logging you in...
    Close

    Login to IntenseDebate

    Or create an account

    Forgot login?

    Cancel Login
    Close WordPress.com

    Lost your password?

    Cancel Login
    Dashboard | Edit profile | Logout
    • Logged in as

    Admin Options

    Save Settings

    Sort by: Date Rating Last Activity

    Loading comments...
    +2 Vote up Vote down
    net worth stat's avatar - Go to profile

    net worth stat · 371 weeks ago

    I love this idea! Gotta try it for my daughter's birthday garland.
    net worth
    Reply
    0 replies · active 371 weeks ago
    0 Vote up Vote down
    patsy's avatar

    patsy · 369 weeks ago

    thanks for the ideal love it
    Reply
    0 replies · active 369 weeks ago
    0 Vote up Vote down
    cua go cao cap's avatar - Go to profile

    cua go cao cap · 318 weeks ago

    Make a sandwich of top fabric with traced letter, then batting, then back fabric with wrong side facing up.
    Read more at cua nhua dai loan
    Read more at cua nhua gia go
    Read more at cua nhua composite
    Read more at mau cua nhua dep
    Reply
    0 replies · active 318 weeks ago
    0 Vote up Vote down
    Lorna Barley's avatar

    Lorna Barley · 318 weeks ago

    Hi Is there a pattern for the letters i can't see them any where.
    Reply
    0 replies · active 318 weeks ago
    -1 Vote up Vote down
    Sharmila SENGUPTA.'s avatar

    Sharmila SENGUPTA. · 289 weeks ago

    Awesome
    Reply
    0 replies · active 289 weeks ago
    0 Vote up Vote down
    go do's avatar

    go do · 244 weeks ago

    I think even a longer name would have taken the same amount of time. It actually took us longer because my daughter was helping me. Here is our tutorial of a quick DIY 10 Minute Fabric Letters Name Decor. I think we may end up doing some of these for the different holidays and hang over our fireplace mantle.
    see more at https://noithatdongthanh.vn/noi-that-go-go-do-dep...
    Reply
    0 replies · active 244 weeks ago
    0 Vote up Vote down
    Marion's avatar - Go to profile

    Marion · 241 weeks ago

    What about combining a couple of steps to make it an even faster project? Instead of tracing the letter onto the fabric, rough cut around the letter, pin the paper letter through all fabric and batting layers, and carefully stitch along the outline of the letter. The needle holes will create perforations, so just carefully tear away the paper and then cut out the letter. This saves having to cut out the letter twice and also saves the tracing step (it seems that no matter what marking method I use on dark fabric, I have a difficult time seeing my tracings). I will be trying this before too long since I have a new grand baby coming soon.
    Reply
    0 replies · active 241 weeks ago

    Post a new comment

      Comment as a Guest, or login:

      • Login to IntenseDebate
      • Login to WordPress.com
      Go back

      Displayed next to your comments.

      Not displayed publicly.

      If you have a website, link to it here.

      Posting anonymously.

      Submit Comment
      Thank you so much for taking the time to comment on this post! Please visit us again.

      Comments by IntenseDebate

        Reply as a Guest, or login:

        • Login to IntenseDebate
        • Login to WordPress.com
        Go back

        Displayed next to your comments.

        Not displayed publicly.

        If you have a website, link to it here.

        Posting anonymously.

        Cancel Submit Comment
        Loading Loading IntenseDebate Comments...


        Welcome

        Hi there! Thanks for visiting my creative corner. I am a DIY enthusiast and single mom to a little girl and a slobbering dog. I enjoy my full time job as a research scientist during the week but like to experiment on sewing and crafty projects on the weekends. Join me as we explore the beautiful world of fabrics together. Read More…

        Craftsy

        Fat Quarter Shop Quilting Fabrics and Supplies

        • Home
        • About Me
        • Tutorials
        • Free Sewing Patterns
        • Shop
        • Roundup
        • Contact

        Copyright © 2025 · Refined theme by Restored 316