• Home
  • About Me
  • Tutorials
    • Bags
    • Children
    • Women
    • Home
  • Free Sewing Patterns
    • Bags
    • Children
    • Women
    • Quilts
    • Home
  • Shop
    • Sale
    • Essentials
    • Flash Sale
    • Kits
    • Sewing Gifts
    • Pre-cut Fabric
    • Sewing Patterns
  • Roundup
  • Contact

The Stitching Scientist

    Gypsy Doll Face Pillow Tutorial and Free Pattern

    Bags· Free Pattern· Purses

    28 Aug

    I saw this gypsy doll face pillow idea in a magazine and fell in love with the concept. I know there are probably others similar to this but I thought this particular design was too pretty to pass up. It’s the perfect beginner project that will make a stunning gift for a little girl. It can also be personalized to look similar to your child by changing the color of the hair, the color of the face fabric and the color of the eyes. The original design was created by Katrina Marie from KidsSewing.org. Please visit her site and enjoy her creations and lessons.

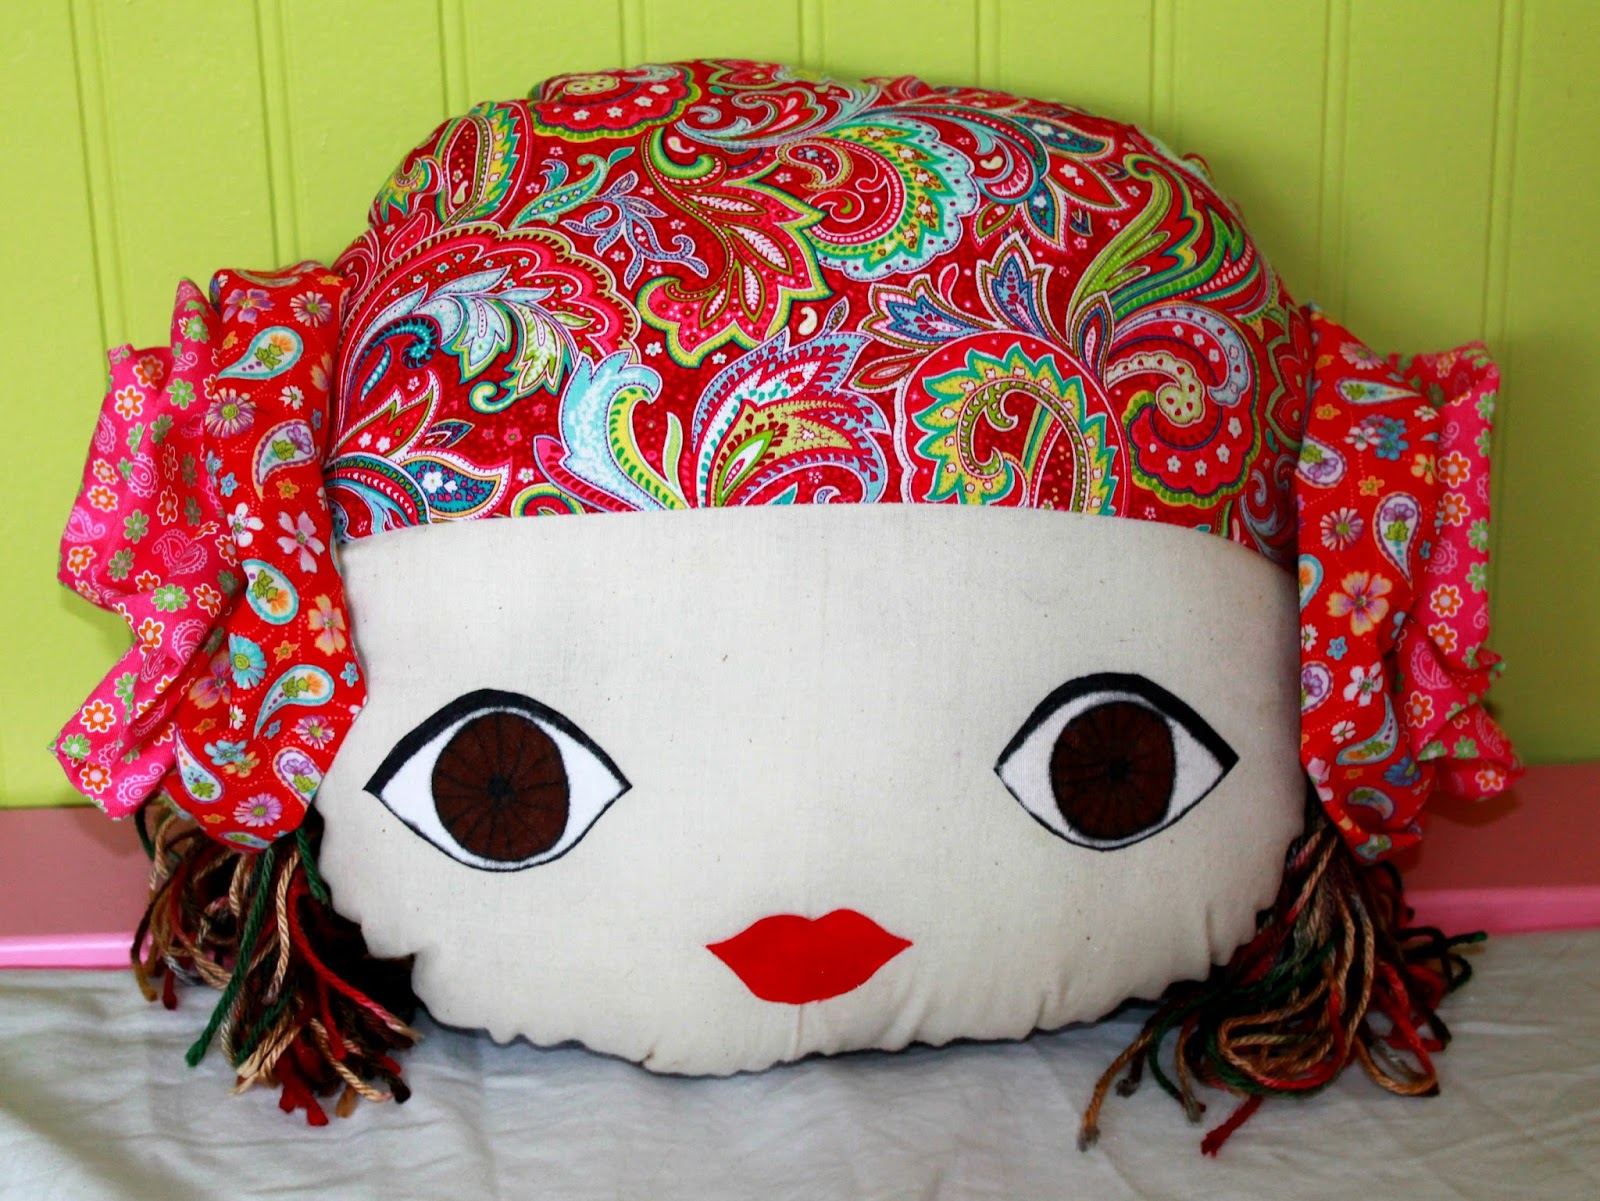
    I made two of these; one with pretty brown eyes for my little Mila and another with gorgeous blue eyes for her cousin. You can also use different fabric designs to fit the season or a specific theme. I personally think these would look best with contrasting colorful bright girly colors. I did bright red and pink for the top scarf and a complimentary bright color for the rosettes.

    This pattern is beginner friendly and the project can be done in about 1 hour or slightly more if you have a toddler pulling at your leg the whole time:-). The entire project for one pillow cost about $15. Most of the expense came from the bright color fabrics. You can personalize the pattern by making it square instead of round, by changing the eyes, the height of the scarf, different options for the back etc. As we go through this tutorial, I will highlight the parts that you can personalize.

    Here is what you need to make one pillow -12” diameter
    ¼ yard dark color cotton for the back
    1 fat quarter bright floral cotton for the top scarf
    1 fat quarter tan muslin for the face
    3 pieces 3” square white cotton for eyes and lip cut out
    3 pieces 3” square fusible interfacing (ultrabond)
    ½ yard coordinating bright cotton for the side rosettes
    3 color sharpies (black for lids and eye outline, red for lips and color of choice for iris)
    Two large bright color buttons to embellish rosettes
    Yarn for hair
    ~8oz Polyfill
    2 large brooch pins (optional)

    Download your pattern HERE. Cut out all your main pieces.  From using the pattern, you should have 1 piece for the face, 1 piece for the scarf and two pieces for the back. For the outer rosettes, cut 2 pieces measuring 9” x22”. For the inner rosettes, cut out 2 pieces measuring 3”x 22”.

    The inner rosette pieces are not shown in the above picture.
    **Pattern change- you can make this pillow bigger by moving the pattern pieces a few inches away from the fold when cutting.  You can also make the rosettes smaller and less dramatic by decreasing your width. For example you can make the outer 6”x22” instead of 9”x22” and 1”x22” for the inner. **
    Lets work on the eyes and lip first.
    Lay one piece your white cotton fabric over the eye pattern and trace it onto your fabric using black sharpie. Color the iris with your color of choice. Apply your ultrabond interfacing on the wrong side of your drawing and iron on (read instructions on your interfacing). After its ironed on, cut it out and set aside. Repeat for the other eye. Remember to trace a mirror image so that you don’t end up with two left or right eyes.
    **Pattern change- you can also use felt to make circular eyes and a one dimensional lip to have the face look less grown up. You can also add pink circles for the cheeks to make it similar to that of a rag doll. **

    Repeat the process for the lips using red sharpie or whatever colors you want your lips to be. Admire how pretty is it is and set aside:-)

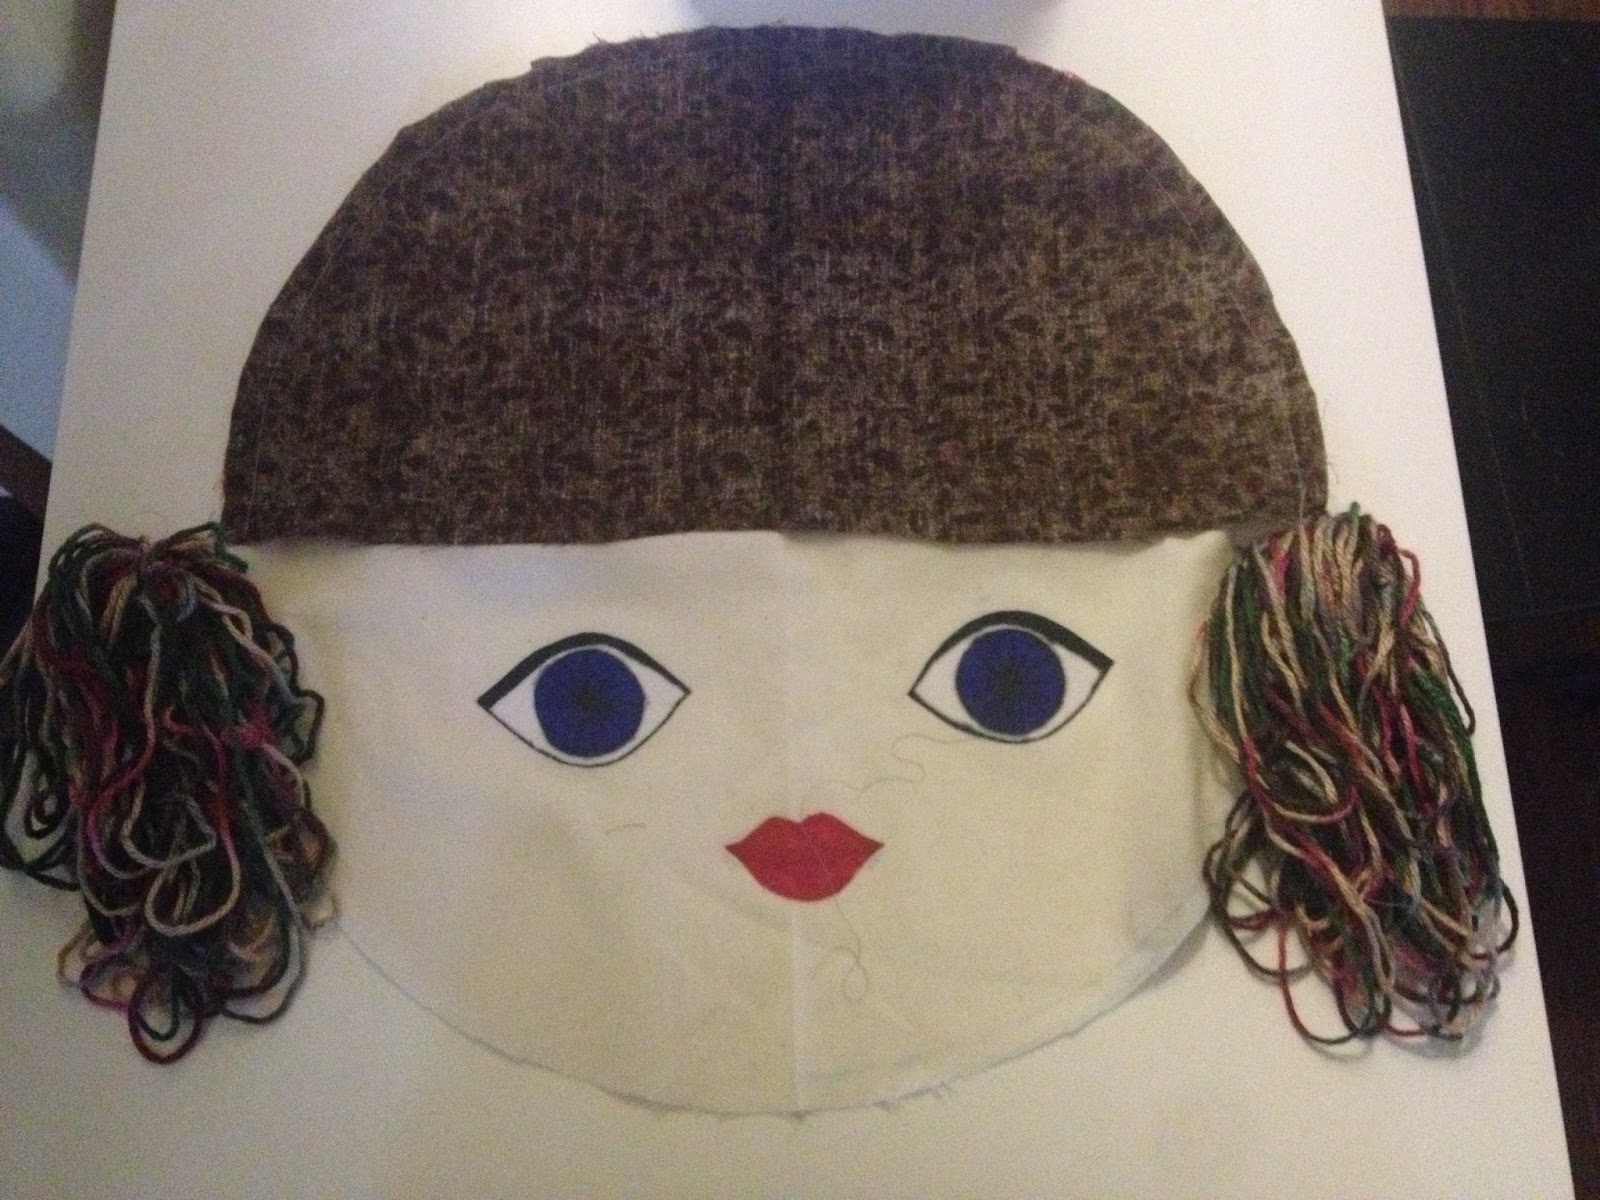
    Now, remove the backing of the interfacing of your eyes and place neatly, following the mark on your pattern onto the muslin face piece. Do the same thing for the lip. The instructions in the magazine said to top stitch the lip and the eyes to the muslin but I didn’t think it was necessary after using the ultrabond interfacing. Remember if you changed the pattern by making the pillow bigger, you will need to relocate your eyes and lip pieces on the face accordingly.

    Next, take your face piece and sew it using ½ seam allowance to the scarf piece right sides together. Iron your seam pressing it towards the scarf.

    Now take your back pieces and fold it in ¼” on the straight sides. Set aside.

    To make the hair, loop around your yard about 50 times in 10” increments. Sew straight through the middle of your hair bundle.

    ** Pattern change-if you want your hair to be thicker or thinner you can decrease or increase your number of loops. To make your hair shorter or longer, you can increase or decrease the length. You can also do it really thick and long and do braids for a hypie look.**

    Take one end of one of your loops and tie a knot in the middle of your bundle of loops making sure it is nice and tight. Cut out all your bottom loops to make both ends of your bundle even.

    To put it all together, take the end (closest to the middle of your hair bundle) of your loop you used to tie the knot on your hair and place it on the right side of front face piece where the scarf and face muslin intersects.

    Now, take one of your back piece and sew it on the front piece, right sides together using ½” seam allowance. You will be sewing over your hair loop when you put the front and back pieces together so make sure you do a few back stitches to secure it well.  Sew in the other back piece.

    Turn your entire project inside out.

    This is what the back looks like once your turn it inside out

    Topstitch the back of the doll close leaving about 5” open to add your stuffing. Once you fill your face with stuffing, close your opening by hand sewing.

    I am sure there is a better way to do this but this seemed like the easiest way to me.

    **To cover up your topstitch at the back of the doll face, you can cut two strips the length of your face, fold in all your edges and neatly hand stitch it over your topstitch. This may be a nice compliment to the back if you do it with a piece of your bright scarf cotton. Also if you have round pillow that will fit the face, you can add zipper at the back and fit your pillow inside the face.**
    Now onto the rosettes!

    Take your large strip and fold it in half lengthwise. Set your stitch length to the longest setting and sew all the way down.

    Gather the strip sew both ends together.

    Do the same thing for your small strip. Once you have both rosettes, hand or machine sew them together in the center.

    Now add your big button to the middle to finish the design. You can also add a fabric covered button as well. Once you have your button on, you can glue on your brooch backing to the rosette which will allow you to clip it to the side of the face of you can simply hand sew it to the face.

    This rosette has a big button in the center instead of the fabric covered button

    Repeat for the other side and you are done!

    « A Different Approach to the UpCycle T-Shirt Tank Top
    Evening Bow Clutch Tutorial »
    Close
    Forgot password?
    Send me my password!

    Close message

    Login
    • This blog post
    • All blog posts

    Subscribe to this blog post's comments through...

    • Add to netvibes
    • Add to My Yahoo!
    • Add to Google
    • Add to Microsoft Live

    RSS Icon RSS Feed

    Subscribe via email

    Subscribe

    Subscribe to this blog's comments through...

    • Add to netvibes
    • Add to My Yahoo!
    • Add to Google
    • Add to Microsoft Live

    RSS Icon RSS Feed

    Subscribe via email

    Subscribe
    Follow the discussion

    Comments (54)

    Loading... Logging you in...
    Close

    Login to IntenseDebate

    Or create an account

    Forgot login?

    Cancel Login
    Close WordPress.com

    Lost your password?

    Cancel Login
    Dashboard | Edit profile | Logout
    • Logged in as

    Admin Options

    Save Settings

    Sort by: Date Rating Last Activity

    Loading comments...
    0 Vote up Vote down
    Actually Amy's avatar - Go to profile

    Actually Amy · 615 weeks ago

    Fab tutorial! My daughter would love this!

    I will be sharing it over on And Sew We Craft next week! Thanks so much for submitting it over there.
    Reply
    0 replies · active 602 weeks ago
    0 Vote up Vote down
    KC's avatar - Go to profile

    KC · 615 weeks ago

    Super cute, Remona.
    Reply
    0 replies · active 602 weeks ago
    0 Vote up Vote down
    Remona's avatar - Go to profile

    Remona · 615 weeks ago

    Thanks so much Amy!! This means so much to me.
    Reply
    0 replies · active 602 weeks ago
    0 Vote up Vote down
    Cindy Epps's avatar - Go to profile

    Cindy Epps · 613 weeks ago

    This is so cute! To bad I can't sew. :(. It's an art.
    Reply
    0 replies · active 602 weeks ago
    0 Vote up Vote down
    Megan Zechman's avatar - Go to profile

    Megan Zechman · 613 weeks ago

    My girls will love this! So cute!
    Reply
    0 replies · active 602 weeks ago
    0 Vote up Vote down
    life...just saying's avatar - Go to profile

    life...just saying · 613 weeks ago

    Love the name of your blog! The tutorial makes me want to pull out my needle and get at it! I am taking a history of sewing class now so who knows what I'll come up with? BTW, do you design websites? Love the banner above your header. Looking to do that on mine. Any suggestions?
    Reply
    0 replies · active 602 weeks ago
    0 Vote up Vote down
    Jennifer Gerlach's avatar - Go to profile

    Jennifer Gerlach · 613 weeks ago

    I Just love this pillow it is so cute. A mini version would make a cute doll.
    Reply
    0 replies · active 602 weeks ago
    0 Vote up Vote down
    Nikki's avatar - Go to profile

    Nikki · 613 weeks ago

    This is a super cute idea. I'm not very crafty at all, but my sister is. She could probably make this.
    http://www.southernpixie.com
    Reply
    0 replies · active 602 weeks ago
    0 Vote up Vote down
    Krissa's avatar - Go to profile

    Krissa · 613 weeks ago

    These are adorable! Sewing is one thing I never learned out to do, but if I did sew, these would definitely be a fun project for my little girl!
    Reply
    0 replies · active 602 weeks ago
    0 Vote up Vote down
    thefatgirldiary's avatar - Go to profile

    thefatgirldiary · 613 weeks ago

    Adorable! I'm going to surprise my younger sisters for their birthday.
    Reply
    0 replies · active 602 weeks ago
    0 Vote up Vote down
    Pam's avatar - Go to profile

    Pam · 613 weeks ago

    So adorable and what a great tutorial. I have a friend who loves to sew and craft and I am going to email her this post. Me....I just don't have the talent. It is a talent.
    Reply
    0 replies · active 602 weeks ago
    0 Vote up Vote down
    popcosmo's avatar - Go to profile

    popcosmo · 613 weeks ago

    Wow, I bet your daughter and her cousin are the happiest little girls in the world right now. Those are so adorable. I wish I had learned to sew... and then taught my daughter. To be able to create like you did is such an amazing talent. And to be able to share that talent is such a gift!
    Reply
    0 replies · active 602 weeks ago
    0 Vote up Vote down
    Designed Decor's avatar - Go to profile

    Designed Decor · 613 weeks ago

    Those are adorable! I have all boys, no girls, but I have a few nieces that would love those!
    Reply
    0 replies · active 602 weeks ago
    0 Vote up Vote down
    Leah Hostetler's avatar - Go to profile

    Leah Hostetler · 613 weeks ago

    These are so cute! I know how to sew but have never really liked it and doubt I would have the patience for this :/
    Reply
    0 replies · active 602 weeks ago
    0 Vote up Vote down
    Pam Allen's avatar - Go to profile

    Pam Allen · 613 weeks ago

    Okay....so freaken cute and I want to make these! This is a project I can do with my daughter- she wants to sew now. We both have sewing machines. The directions and pictures help out a lot! New Fan!
    Reply
    0 replies · active 602 weeks ago
    0 Vote up Vote down
    mrsgregwillis's avatar - Go to profile

    mrsgregwillis · 612 weeks ago

    Adorable! I have blue eyes, but the brown eyed beauty is amazing. (Dark, mysterious gypsy?) I still have a Raggedy Ann my parents sewed for me -- hope your girls love these as much as we all seem to. <3
    Reply
    0 replies · active 602 weeks ago
    0 Vote up Vote down
    Kelli H's avatar - Go to profile

    Kelli H · 612 weeks ago

    What a fun project! I just started sewing this year and really like it. I definitely always have a toddler or two pulling at my leg, too. :)
    Reply
    0 replies · active 602 weeks ago
    0 Vote up Vote down
    Kelli H's avatar - Go to profile

    Kelli H · 612 weeks ago

    PS going to pin this for later! :) xoxo
    Reply
    0 replies · active 602 weeks ago
    0 Vote up Vote down
    The Lady's avatar - Go to profile

    The Lady · 612 weeks ago

    These look very cool and it is also a great idea. Thank you for the great inspiration.
    Reply
    0 replies · active 602 weeks ago
    -1 Vote up Vote down
    BFF's avatar - Go to profile

    BFF · 612 weeks ago

    Those dolls are creepy looking. I would totally piss myself if I walked into the room in the middle of the night and these were sitting on the chair. Actually that might be a good idea to scare the daylights out of my boyfriend..... *cackles*
    Reply
    0 replies · active 602 weeks ago
    0 Vote up Vote down
    Jae Mac's avatar - Go to profile

    Jae Mac · 612 weeks ago

    These are very pretty and you make it look so easy, but I have never sewn anything. So easy enough for a beginner may still be too complicated for me.
    Jae Mac @ I'm Just Sayin'...(Damn!)
    Reply
    0 replies · active 602 weeks ago
    0 Vote up Vote down
    Leyla Preston's avatar - Go to profile

    Leyla Preston · 612 weeks ago

    Thanks so much for sharing this post. I can't wait to start creating pillows like these for my boys - I will have to amend the design a little as the above pillows are made for girls, but I will definitely attempt to make this.

    You make it look so easy!

    Well done :-)
    Reply
    0 replies · active 602 weeks ago
    0 Vote up Vote down
    Gena at ichoosejoy.o's avatar - Go to profile

    Gena at ichoosejoy.o · 612 weeks ago

    Very, very cute! It reminds me of a doll I had growing up -- same kind of paisley fabric.
    Great tutorial. I'll pin it!
    --Gena
    Reply
    0 replies · active 602 weeks ago
    0 Vote up Vote down
    Jennifer Young's avatar - Go to profile

    Jennifer Young · 612 weeks ago

    OMG, what a cute pillow!! These are the kind of projects that make me wish I had a girl! :)
    Reply
    0 replies · active 602 weeks ago
    0 Vote up Vote down
    Carrie Swank's avatar - Go to profile

    Carrie Swank · 612 weeks ago

    So cute! I don't sew but I can see that you have quite the talent for it and also for doing the tutorial. Great descriptive instructions and helpful photos. If I did sew I think following your directions would make it pretty easy.
    Reply
    0 replies · active 602 weeks ago
    123Next »

    Post a new comment

      Comment as a Guest, or login:

      • Login to IntenseDebate
      • Login to WordPress.com
      Go back

      Displayed next to your comments.

      Not displayed publicly.

      If you have a website, link to it here.

      Posting anonymously.

      Submit Comment
      Thank you so much for taking the time to comment on this post! Please visit us again.

      Comments by IntenseDebate

        Reply as a Guest, or login:

        • Login to IntenseDebate
        • Login to WordPress.com
        Go back

        Displayed next to your comments.

        Not displayed publicly.

        If you have a website, link to it here.

        Posting anonymously.

        Cancel Submit Comment
        Loading Loading IntenseDebate Comments...


        Welcome

        Hi there! Thanks for visiting my creative corner. I am a DIY enthusiast and single mom to a little girl and a slobbering dog. I enjoy my full time job as a research scientist during the week but like to experiment on sewing and crafty projects on the weekends. Join me as we explore the beautiful world of fabrics together. Read More…

        Craftsy

        Fat Quarter Shop Quilting Fabrics and Supplies

        • Home
        • About Me
        • Tutorials
        • Free Sewing Patterns
        • Shop
        • Roundup
        • Contact

        Copyright © 2025 · Refined theme by Restored 316